Recent Updates
AngularJS
AngularJS
- AngularJS는 새로운 속성으로 HTML을 확장합니다.
- AngularJS는 단일 페이지 응용 프로그램 (Single Page Applications, SPA)에 적합합니다.
AngularJS는 JavaScript 프레임 워크
-
AngularJS는 JavaScript 프레임 워크( JavaScript로 작성된 라이브러리)입니다.
-
AngularJS는 태그를 사용하여 HTML 페이지에 추가 할 수 있습니다.

AngularJS는 HTML을 확장
- AngularJS는 ng-directives로 HTML을 확장합니다.
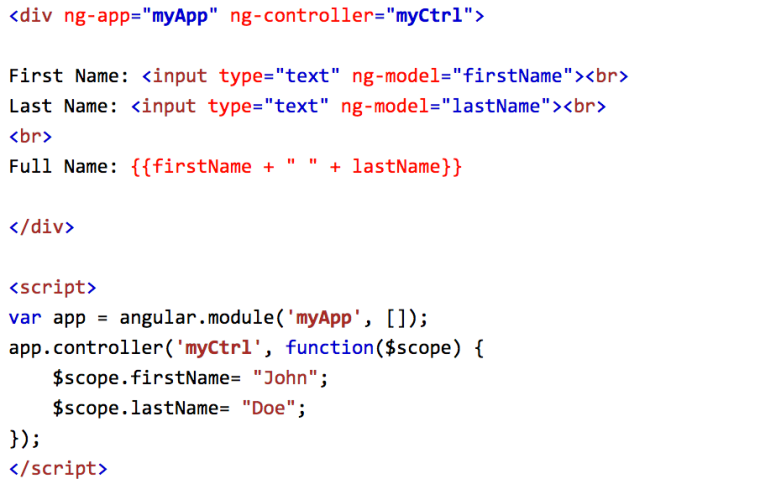
- ng-app 지시자는 AngularJS와 응용 프로그램을 정의합니다.
- ng-model 지시자는 애플리케이션 데이터를 HTML 제어 값 (입력 선택, 텍스트 영역)을 결합한다.
- ng-bind 지시문은 HTML보기로 응용 프로그램 데이터를 결합한다.

예제 설명 :
- AngularJS는 웹 페이지가로드되면 자동으로 시작됩니다.
- ng-app 지시자는 AngularJS 에게
요소가 AngularJS 응용 프로그램의 “소유자”임을 알려준다.
- ng-model 지시자는 input 필드의 값을 응용 프로그램의 변수 “name“에 결합한다.
( i.e. “name” = value of ) - ng-bind 지시자는요소의 innerHTML을 응용 프로그램의 변수 “name” 에 연결한다.
( i.e. innerHTML of= “name” )
AngularJS 지시자(Directives)
- AngularJS directives은 접두사 가 ng 인 HTML 속성입니다 .
- ng-init 지시어는 AngularJS 응용 프로그램 변수를 초기화한다.

AngularJS Expressions(표현식)
- AngularJS 표현식은 이중 중괄호 {{expression}} 안에 작성됩니다 .
- AngularJS는 정확히 표현식이 쓰여지는 곳에 데이터를 “출력”합니다.

- AngularJS 표현식은 ng-bind 지시자와 동일한 방식으로 AngularJS 데이터를 HTML에 연결합니다.

AngularJS Applications
- AngularJS modules 은 AngularJS applications 을 정의합니다.
- AngularJS controllers 는 AngularJS applications 을 제어합니다.
- ng-app 지시자는 응용프로그램을 정의하며, ng-controller 지시자는 controller 를 정의 합니다.
AngularJS Expressions
- AngularJS 표현식은 이중 중괄호 안에 쓸 수 있습니다 .
{{ expression }} - AngularJS 표현식은 지시 자 안에도 쓸 수 있습니다 .
ng-bind="expression" -

-

-

-

-

-

-

-

-

-

-

AngularJS Modules
- AngularJS 모듈은 응용 프로그램을 정의합니다.
- 모듈은 응용 프로그램의 여러 부분을 담는 컨테이너입니다.
- 모듈은 응용 프로그램 제어기의 컨테이너입니다.
- 컨트롤러는 항상 모듈에 속합니다.
모듈 만들기
- AngularJS 함수
angular.module를 사용하여 모듈을 만듭니다.

“myApp” 매개 변수는 응용 프로그램이 실행될 HTML 요소를 나타냅니다.
이제 컨트롤러, 지시문, 필터 등을 AngularJS 응용 프로그램에 추가 할 수 있습니다.
컨트롤러 추가하기
응용 프로그램에 컨트롤러를 추가하고 ng-controller지시어로 컨트롤러를 참조하십시오 .

지시자(directive) 추가
AngularJS에는 응용 프로그램에 기능을 추가하는 데 사용할 수 있는 내장 지시문 세트가 있습니다.

파일 형태의 모듈 및 컨트롤러
- AngularJS 응용 프로그램에서는 모듈과 컨트롤러를 JavaScript 파일에 저장하는 것이 일반적입니다.
- 이 예제에서 “myApp.js”는 응용 프로그램 모듈 정의를 포함하고 “myCtrl.js”는 컨트롤러를 포함합니다.

- myApp.js

- myCtrl.js

MongoDB
RDB vs. NoSQL
관계형 데이터베이스 (RDB)는 데이터를 Column(열)과 Row(행)로서 나타내었다. 각 Column은 데이터의 타입을 표현하고, 각 Row는 하나의 레코드 Entry (Record)를 의미한다. 반면, Mongo DB는 문서형 데이터베이스의 대표적인 케이스로, RDB와는 다른 구조적 특징을 가지고 있다.
- Row는 있지만 Column이 없다.
: 정확히는 Row 속에 RDB에서의 Column 역할이 포함되어 있다고 볼 수 있다.
: 문서형 데이터베이스에서 하나의 Row는 데이터 타입과 각 데이터 타입에 부합하는 데이터를 모두 소유한다.
: 이전 RDB에서는 모든 Row가 동일한 Column에 종속적이었던 것과 달리, 문서형 데이터베이스는 각 Row가 서로 다른 Column의 종류, 개수를 소유하는 것이 가능하다. - 무엇이 좋은점인가?
: 엄격한 구조적 지배에서 벗어나서 확장성이 매우 높다고 볼 수 있다.
: 기존 RDB는 Column이 다른 구조화된 자료구조를 가지는 것이 불가능 했으며, 이를 외래키(Foreign Key)로 해결하고자 하였다. 하지만 문서형 데이터베이스는 어떠한 데이터 타입이라도 수용 가능한 JSON 이라는 형태의 구조를 가진다. - 관계형 데이터베이스의 테이블 –> 컬렉션(collection), 레코드 –> 문서객체(document)
Installation & CLI commands
a more detailed tutorial : slide / video
- mongodb download and install
- path system 변수에 몽고디비 설치 폴더 아래의 bin 폴더를 추가
- 윈도우 사용자 계정 폴더 아래에 database/local 폴더 생성
- 명령프롬프트 창에서 다음과 같이 db 서버를 실행 후
$ cd C:\mongodb\bin
$ mongod – -dbpath C:\users\user\database\local
or
$ mongod – -dbpath C:/users/user/database/local //<=== on Git-bash다음에는 또 다른 명령프롬프트 창에서 다음과 같이 클라이언트를 실행합니다.
$ mongo
> cls
> show dbs // <=== DB 들을 표시
admin 0.000GB
local 0.000GB
> use test // <=== DB 를 새로운 이름으로 선택하면 바로 생성됨.
switched to db test
> db // <==== DB 제거는 db 선택 후 db.dropDatabase()
test
> db.createCollection(‘customers’); // <== collection 생성
{ “ok” : 1 }
> show collections
customers
> db.customers.insert({name:’person-1′ , age:25})
WriteResult({ “nInserted” : 1 })
> db.customers.find()
{ “_id” : ObjectId(“451451j1451451451514jlk1l1kj”), “name” : “person-1”, “age”:25 }
> db.customers.find().pretty()
{
“_id” : ObjectId(“451451j1451451451514jlk1l1kj”),
“name” : “person-1”,
“age”:25
}gkrh
> db.dropDatabase() // <==== DB 제거는 db 선택 하고 실행
> show dbs
admin 0.000GB
local 0.000GB
> use store // <===== store 라는 새로운 DB 생성
// <===== document 삽입하면 collection 자동 생성
> db.books.insert({title:’Book-0′, content:’Zero’, author:’Jun Ji’})
WriteResult({ “nInserted” : 1 })
> show collections
books
> db.books.find().pretty()
{
“_id” : ObjectId(“451451j1451451451514jlk1l1kj”),
“title” : “Book-0”,
“content”:”Zero”,
“author”:”Jun Ji”
}
> db.books.insert([
. . . {title:’Book-1′, content:’One’, author:’Jun Ji’},
. . . {title:’Book-2′, content:’Two’, author:’Andy Ji’},
. . . {title:’Book-3′, content:’Three’, author:’Jenny Ji’, age: 21}
])
> ….
> db.books.find()
…
> db.books.remove({name:”Jenny Ji”});
> db.books.find()
…
> db.books.remove({name:”Jun Ji”},{justOne:true});
> db.books.find()
…
> db.books.update({name:”Jun Ji”},{name:”Junji”, age:54, gender:”male”});
…
> db.books.update({name:”Andy Ji”},{name:”Andy Ji”, age:27, gender:”male”});
…
> db.books.updata({name:”Jun Ji”}, {$inc:{age:5}});
…
> db.books.updata({name:”Jun Ji”}, {$unset:{age:1}});
> db.books.updata({name:”Jun Ji”}, {$rename:{“gender”:”sex”}});
…> db.books.find({name:”Jun Ji”});
> db.books.find({$or:[{name:”Jun Ji”},{name:”Andy Ji”}]);
> db.books.find({gender:”male”});
> db.books.find({age:{$lt:40}});
> db.books.find().sort({name:1});
> db.books.find().sort({name:-1}).pretty();
> db.books.find().count();
> db.books.find({gender:”male”).count();
> db.books.find().limit(4).sort({name:1});
> db.books.find().forEach(function(doc){print(“Customer Name: “+doc.name)}).count();
Connecting DB from Web
a good tutorial link for shopping cart using NodeJS
- module installation
$ npm install – -save mongoose
- Include mongoose module into app.js
…
var mongoose = require(‘mongoose’);
mongoose.connect(‘mongodb://localhost:27017/store’);
… - Prepare view/index.pug
extends layout
block content
h1 MONGODB Exercise
section(class=”insert”)
h3 Insert Data
form(action=”/insert” method=”post”)
div(class=”input”)
label(for=”title”) Title
input(type=”text” id=”title” name=”title”)
div(class=”input”)
label(for=”content”) Content
input(type=”text” id=”content” name=”content”)
div(class=”input”)
label(for=”author”) Author
input(type=”text” id=”author” name=”author”)
div
button(type=”submit”) Insertsection(class=”get”)
h3 Get Data
a(href=”/get-data”) LOAD Data
div
each item in items
div(class=”item”)
div id : #{item._id}
div Title : #{item.title}
div Content : #{item.content}
div Author : #{item.author}section(class=”update”)
h3 Update Data
form(action=”/update” method=”post”)
div(class=”input”)
label(for=”id”) ID
input(type=”text” id=”id” name=”id”)
div(class=”input”)
label(for=”title”) Title
input(type=”text” id=”title” name=”title”)
div(class=”input”)
label(for=”content”) Content
input(type=”text” id=”content” name=”content”)
div(class=”input”)
label(for=”author”) Author
input(type=”text” id=”author” name=”author”)
div
button(type=”submit”) Updatesection(class=”delete”)
h3 Delete Data
form(action=”/delete” method=”post”)
div(class=”input”)
label(for=”id”) ID
input(type=”text” id=”id” name=”id”)
button(type=”submit”) DELETE - And public/stylesheets/style.css
body {
padding: 50px;
font: 14px “Lucida Grande”, Helvetica, Arial, sans-serif;
}a {
color: #00B7FF;
}section {
float: left;
background: #bdc3c7;
padding: 10px;
margin: 30px;
width: 300px;
box-shadow: 3px 3px 1px #34495e;
min-height: 400px;
}section:first-of-type {
margin-left: 0;
}section:last-of-type {
margin-right: 0;
}section h3 {
border-bottom: 1px solid black;
padding-bottom: 5px;
}.insert {
background: #2ecc71;
}.get {
background: #ecf0f1;
}.update {
background: #3498db;
}.delete {
background: #e74c3c;
}.input label {
display: block;
font-weight: bold;
padding: 2px 0;
}input,
button {
font: inherit;
}button {
margin-top: 10px;
border: none;
box-shadow: 1px 1px 1px #34495e;
border-radius: 0;
background: #ecf0f1;
cursor: pointer;
}button:hover {
background: #bdc3c7;
}.item {
margin: 10px 0;
padding: 5px;
background: #95a5a6;
border: 1px solid black;
} - Insert a schema at models/book.js as
var mongoose = require(‘mongoose’);
var Schema = mongoose.Schema;var bookSchema = new Schema({
title: String,
content: String,
author: String
});module.exports = mongoose.model(‘book’, bookSchema);
- Now…. Edit routes/index.js as
var express = require(‘express’);
var router = express.Router();
var Book = require(‘../models/book’)/* GET home page. */
router.get(‘/’, function(req, res) {
res.render(‘index’, {items: []});
});// GET ALL BOOKS
router.get(‘/get-data’, function(req,res,next){
Book.find(function(err, books){
if(err) return res.status(500).send({error: ‘database failure’});
res.render(‘index’, {items: books});
})
});// CREATE BOOK
router.post(‘/insert’, function(req, res,next){
var newBook = new Book();
newBook.title = req.body.title;
newBook.content = req.body.content;
newBook.author = req.body.author;newBook.save(function(err){
if(err){
console.error(err);
res.json({result: 0});
return;
}
res.redirect(‘/’);
});
});// UPDATE THE BOOK
router.post(‘/update’, function(req, res, next){
Book.update({ _id: req.body.id }, { $set: req.body }, function(err, output){
if(err) res.status(500).json({ error: ‘database failure’ });
console.log(output);
if(!output.n) return res.status(404).json({ error: ‘book not found’ });
//res.json( { message: ‘book updated’ } );
res.redirect(‘/’);
})
});// DELETE BOOK
router.post(‘/delete’, function(req, res, next){
Book.remove({ _id: req.body.id }, function(err, output){
if(err) return res.status(500).json({ error: “database failure” });
//res.status(204).end();
//res.json({ message: “book deleted” });
res.redirect(‘/’);
})
});module.exports = router;
Express
* 주의 : 본 강의록의 코드를 복사해서 편집기에 입력하면 작동되지 않을 가능성이 높습니다.
직접 입력해서 실험하시길 권장합니다.
Web Server구축
- 웹사이트를 구축할 폴더를 새로 만들고 (eg: $ mkdir ex-test; cd ex-test), 이동 후
$ npm init
기본값을 사용하기 위해 return 을 계속 누르면, package.json 생성. ( JSON (JavaScript Object Notation) 문법에 기초하여 내용 살펴보기)
- npm 으로 express module 을 설치 ( 그리고, package.json 다시 보기)
$ npm install express –save
- http://expressjs.com/ 를 방문해서 “Getting Started” > “Hello world” 를 살펴봅니다.
- 동일한 폴더에 app.js 파일을 생성하고 다음 코드를 입력하세요.
var express = require(‘express’);
var app = express();var server = app.listen(3000, function(){
console.log(“Express server has started on port 3000”)
}) -
$ node app.js
를 입력하면 포트 3000으로 웹 서버를 열고, 콘솔에 메시지를 표시합니다. 그러나, 브라우져를 사용해서 localhost:30000 으로 서버에 접속하면 “Cannot GET /” 이라는 텍스트가 나타납니다. (왜냐하면, Router를 아직 정의하지 않았으니까요.)
- Router로 Request 처리하기 : 브라우저에서 Request 가 왔을때 서버에서 어떤 작업을 할 지 Router 를 통하여 설정해주어야합니다. 특히, URL 로 서버에 request 를 보내는 방식은 GET방식이라고 하며, GET방식으로 온 request 에 응답하기 위한 코드는 다음과 같다.
app.get(‘/’, function(req, res){
res.send(‘Hello World’);
});이 코드를 추가해주고 server.js 를 재실행하면, http://localhost:3000/ 으로 접속하였을 때, Hello World 를 반환합니다.
- 만약에 사용자가 localhost:3000/login 으로 접속해 들어 올 경우 “Login Please” 라는 메시지를 html 의 <h1> 요소로 표시하고 싶으면, 다음과 같은 코드가 추가 되어야 합니다.
app.get(‘/login’, function(req, res) {
res.send(‘<h1>Login Please</h1>’)
})서버를 껐다가 다시 실행 후, http://localhost:3000/login 으로 접속해 결과를 확인해 보시오.
- 이처럼, 서로 다른 요청에 맞도록 응답을 연결해 주는 것은 routing 이라 하며, 이를 수행하는 코드를 router 라고 부른다.
정적인 파일 서비스 (Static file service)
- 이미지나 텍스트 파일와 같은 정적인 파일을 서비스하는 방법
- 폴더 안에 public 이라는 이름의 폴더를 만들고, 그 안에 이미지 파일 하나를 가져다 놓는다. ( eg: $ mkdir public )
- 다음의 코드를 app.js 에 넣고, http://localhost:3000/freepik.jpg 로 접속한다.
app.use(express.static(‘public’));
- public 폴더에 임의의 파일 (eg. test.html) 을 만들어 넣고, http://localhost:3000/test.html 로 접속해 보시오.
- 또는 router 에서 정적인 파일을 응답의 일부로 사용할 수 도 있다.
app.get(‘/route’, function(req, res) {
res.send(‘Hello Route with image <img src=”/freepik.jpg”> ‘)
}) - [option] 동적인 (dynamic) 파일의 장점을 살펴보기 위해서 다음과 같은 코드를 작성해 실험해 보시오.
app.get(‘/dynamic’, function(req, res) {
var lists = ”;
for (var i=0; i<5; i++) {
lists += ‘<li>coding</li>’;
}
var time = Date();
var output ='<h1> Hello Dynamic ! </h1> <ul>’ + lists + ‘</ul>’ + time;
res.send(output);
})
Template engine 사용
- 참조 : http://expressjs.com => Guide => Using template engine
- pug module 을 설치합니다.
$ npm install pug –save
- 폴더 안에 views 라는 이름의 폴더를 만들고, 그 안에 index.pug 파일을 다음과 같은 내용으로 생성합니다. (Note: tab 사용 및 개수에 주의)
html
_tab head
_tab_tab title= title
_tab body
_tab_tab h1 Hello from Pug
_tab_tab h2 anothe greeting
_tab_tab ul
_tab_tab_tab -for (var i=0; i<5; i++)
_tab_tab_tab li coding #{i}
_tab_tab div= time - 다음의 코드를 app.js 에 넣고, http://localhost:3000/template로 접속한다.
app.locals.pretty = true;
app.set(‘views’, ‘./views’)
app.set(‘view engine’, ‘pug’)
….
app.get(‘/template’, function(req, res) {
res.render(‘index’,{title:’pug title’, time:Date()})
}); - 소스코드가 변경되었을 때 에플리케이션을 자동으로 재시작하는 방법
$ npm install -g supervisor
$ supervisor app
URL을 이용한 정보의 전달
- Query string – 데이터를 URL 뒤에 값을 붙여서 전송. [ ex. http://a.com/topic?id=1&name=jun ] 물음표(?) 이후 부터 값을 나타내며, “=” 를 통해 변수와 값이 쌍으로 이루어짐. 하나 이상의 값일 경우 “&” 를 통해서 값을 구분. 이처럼 URL의 실제 주소 뒤에 붙는 것을 쿼리 스트링(Query String)라고 부른다.
- 다음의 코드를 app.js 에 넣고, http://localhost:3000/topic?id=3&name=Jun 으로 접속한다.
app.get(‘/topic’, function(req,res) {
res.send(req.query.id + ‘, ‘+req.ruery.name);
}) - 참조 : express reference for req.query
- 좀 더 현질적인 응용의 예…
app.get(‘/topic’, function(req,res) {
var topics = [
‘JavaScript is …’,
‘NodeJS is …’,
‘Express is …’
]
var output = `
<a href=”topic?id=0″> JavaScript <a></br>
<a href=”topic?id=1″> NodeJS <a></br>
<a href=”topic?id=2″> express <a></br>
${topics[req.query.id]}
`
res.send(output);
}) - 의미론적(Semantic) URL 방식 – query string 대신에 URL path의 일부로 파라메타 전달방식 ( wikipedia 참조 ). 다음의 코드를 app.js 에 넣고, http://localhost:3000/topic/0 또는 http://localhost:3000/topic/0/edit 로 접속한다.
app.get(‘/topic/:id’, function(req,res) {
var topics = [
‘JavaScript is …’,
‘NodeJS is …’,
‘Express is …’
]
var output = `
<a href=”/topic/0″> JavaScript <a></br>
<a href=”/topic/1″> NodeJS <a></br>
<a href=”/topic/2″> express <a></br>
${topics[req.params.id]}
`
res.send(output);
})app.get(‘/topic/:id/:mode’, function(req, res) {
res.send(req.params.id + ‘, ‘+req.params.mode)
})
POST 방식을 이용한 정보의 전달
- 우선 post 방식으로 정보를 전달하는 form 을 포함하는 html 파일을 다음과 같이 pug 템플릿으로 작성해 보자. (i.e. views 폴더에 form.pug 파일 생성 )
doctype html
html
_tab head
_tab_tab meta(charset=’utf-8′)
_tab body
_tab_tab form(action=’/form_receiver’ method=’post’)
_tab_tab_tab p
_tab_tab_tab_tab input(type=’text’ name=’title’)
_tab_tab_tab p
_tab_tab_tab_tab textarea(name=’description’)
_tab_tab_tab p
_tab_tab_tab_tab input(type=’submit’) - 그리고, 다음의 코드를 app.js 에 삽입한 후에 http://localhost:3000/form 으로 접속하여 확인한다.
app.get(‘/form’, function(req, res){
res.render(‘form’, {title:’pug’, time:Date()})
}) - post 방식으로 전달된 정보를 해석하기 위해서는 body-parser 라는 module 이 설치되어야 합니다.
$ npm install body-parser–save
- 다음의 코드를 app.js 에 넣고, http://localhost:3000/form 으로 접속하여, 내용을 채운 후에 제출합니다. (참조: express reference for req.body )
var bodyParser = require(‘body-parser’);
…
app.use(bodyParser.urlencoded({ extended: true }));
…
app.post(‘/form_receiver’, function(req, res) {
var title = req.body.title;
var description = req.body.description;
res.send(title + ‘, ‘ + description)
})
Express application generator
- 응용 프로그램 생성 도구 인
express-generator을 사용하여 응용 프로그램 골격을 빠르게 만듭니다.express-generator패키지는express명령도구를 설치합니다. 이렇게 하려면 다음 명령을 사용하십시오.
$ npm install express-generator -g
- 예를 들어, 다음은 myapp 라는 Express 어플리케이션을 작성합니다 . 응용 프로그램은 현재 작업 디렉토리의 myapp 라는 폴더에 생성되며 뷰 엔진은 Pug 로 설정됩니다 .
$ express –view=pug myapp
create : myapp
create : myapp/package.json
create : myapp/app.js
create : myapp/public
…. - 그런 다음 dependencies 들을 설치하십시오.
$ cd myapp
$ npm install - 그리고 다음의 명령을 실행하시오
$ set DEBUG=myapp:* & npm start
- 그런 다음 브라우저에 http://localhost:3000/ 로 앱에 액세스하십시오. 생성된 앱의 디렉토리 구조는 다음과 같습니다..
├── app.js
├── bin
│ └── www
├── package.json
├── public
│ ├── images
│ ├── javascripts
│ └── stylesheets
│ └── style.css
├── routes
│ ├── index.js
│ └── users.js
└── views
├── error.pug
├── index.pug
└── layout.pug7 directories, 9 files
Homework # 1
사용자로부터 필요한 정보를 입력받아 그 정보들을 다시 사용자에게 보여주는 페이지 (http://your.server.ip/register) 작성하기. 요구되는 사항은 다음과 같습니다.
- AWS 에 node.js 와 express 프레임워크 설치
- express-generator 로 기본 웹구조 완성
- 해당 페이지는 twitter-bootstrap 스타일로 보여지도록 제작
- [ detail ] index.js 에 post 방식 router 추가
- [ detail ] views 폴더에 register.pug 작성
- 결과 링크는 homework-wiki 에 작성 제출 !!
(Hint)
- /views/layout.pug for bootstrap
doctype html
html
head
title= title
meta(name=’viewport’, content=’width=devide-width’, initial-scale=1) link(rel=’stylesheet’, href=’/stylesheets/style.css’)
link(rel=’stylesheet’,href=’https://maxcdn.bootstrapcdn.com/bootstrap/3.3.7/css/bootstrap.min.css’)
script(src=’https://ajax.googleapis.com/ajax/libs/jquery/3.2.1/jquery.min.js’)
script(src=’https://cdnjs.cloudflare.com/ajax/libs/twitter-bootstrap/4.0.0-beta/js/bootstrap.min.js’) body block content
Node.js
Node.js 란?
- Node.js는 JavaScript 런타임(실행되는 곳 / 구동되는 환경)입니다.
- Node.js는 오픈 소스 서버 프레임 워크입니다.
- Node.js는 무료입니다.
- Node.js는 다양한 플랫폼 (Windows, Linux, Unix, Mac OS X 등)에서 실행됩니다.
- Node.js는 서버에서 JavaScript를 사용하게 해줍니다.
왜 Node.js 를 사용합니까? — 가볍고, 효율적 !
- Node.js 는 구글 크롬의 V8 자바스크립트 엔진을 사용하여 빠른 코드 실행을 제공합니다.
- Node.js 는이벤트 루프와 함께 단일 스레드(single-threaded) 모델을 사용합니다. 이벤트 메커니즘은 서버가 멈추지않고 반응하도록 해주어 서버의 확장성을 키워줍니다. 쓰레드를 한 개만 사용하고 Apache 같은 웹서버보다 훨씬 많은 요청을 처리할 수 있습니다.
- Node.js 는 비 차단(non-blocking), 비동기식 (asynchronous) 프로그래밍을 실행합니다. API가 실행되었을때, 데이터를 반환할 때까지 기다리지 않고, 다음 API 를 실행합니다. 그리고 이전에 실행했던 API가 결과값을 반환할 시, Node.js 의 이벤트 알림 메커니즘을 통해 결과값을 받아옵니다.
Node.js 는 무엇을 할 수 있습니까?
- Node.js는 동적(dynamic) 페이지 콘텐츠를 생성 할 수 있습니다.
- Node.js는 서버에서 파일을 생성, 열기, 읽기, 쓰기, 삭제 및 닫을 수 있습니다.
- Node.js는 양식(form) 데이터를 수집 할 수 있습니다.
- Node.js는 데이터베이스의 데이터를 추가, 삭제, 수정할 수 있습니다.
Node.js를 쓰기에 적절한 분야
- 입출력이 잦은 어플리케이션
- 데이터 스트리밍 어플리케이션
- 데이터를 실시간으로 다루는 어플리케이션
- JSON API 기반 어플리케이션
- 싱글페이지 어플리케이션
Node.js를 쓰지 말아야 할 곳!
- CPU 사용률이 높은 어플리케이션
Download & Install
- Download Node.js from the official Node.js web site: https://nodejs.org
- cmd 창에서 $ node -v 로 버전 확인.
- cmd 창에서 $npm -v 로 버전 확인.
- 폴더 만들기 C:\Users\Your Name\www
* 주의 : 본 강의록의 코드를 복사해서 편집기에 입력하면 작동되지 않을 가능성이 높습니다.
직접 입력해서 실험하시길 권장합니다.
Get Started – Hello World
텍스트 에디터( Sublime Text, Brackets, Visual Studio Code, Atom, 와 같은 )를 사용하여 “myfirst.js”라는 Node.js 파일을 만들고, 다음 코드를 추가합니다. 그리고 당신의 컴퓨터에 “C:\Users\Your Name\www\myfirst.js” 로 저장합니다 :
/* Hello World in Node.js */
console.log(“Hello, World!”);
Node.js 파일은 컴퓨터의 “Command Line Interface”프로그램에서 시작되어야 합니다.
컴퓨터에서 Command Line Interface를 시작하는 방법은 운영 체제에 따라 다릅니다. Windows 사용자의 경우 “시작” 버튼을 누르고 “명령 프롬프트(Command Prompt)”를 찾거나 검색 필드에 “cmd“라고 적어주십시오. ( 대신에 Git-Bash 를 쓰면 unix 명령어로 작동되어 편리함.)
- 유용한 Unix 명령어들 : ls / ls -al / cd / cd .. / less [filename] / mkdir [dir_name] / rmdir [dir_name] /
방금 작성한 파일은 Node.js에 의해 시작되어야 작업이 수행 될 수 있습니다. 다음과 같이 “node myfirst.js” 라고 입력하고 Enter 키를 누르십시오.
C:/Users/Your Name/www> node myfirst.js
작업환경이 성공적으로 설정되었다면 Hello World! 이 출력됩니다.
chrome 브라우져에서도 console 에서 ( i.e. F12 => console ) 같은 실험이 가능합니다.
Get Started – Web Server
이번에는 “myfirst.js”에 다음 코드를 추가합니다. ( from http://nodejs.org/en/about )
const http = require(‘http’);
const hostname = ‘127.0.0.1’;
const port = 3000;const server = http.createServer((req, res) => {
res.statusCode = 200;
res.setHeader(‘Content-Type’, ‘text/plain’);
res.end(‘Hello World\n’);
});server.listen(port, hostname, () => {
console.log(`Server running at http://${hostname}:${port}/`);
});
Command Line Interface를 시작하고, 다음과 같이 “node myfirst.js” 라고 입력하고 Enter 키를 누르십시오. ( 그리고, function 형식 변화 실험 “(req,res) =>” == “function(req,res)” )
C:/Users/Your Name/www>node myfirst.js
이제 컴퓨터가 웹 서버로 작동합니다. 누군가 포트 3000에서 컴퓨터에 액세스 하면, 그 응답으로 “Hello World!”가 표시됩니다. 그리고, 콘솔에는 다음과 같이 표시됩니다.
Server is running at http://127.0.0.1:3000
인터넷 브라우저를 시작하고 주소 (http : // localhost : 3000)를 입력하십시오
* port 번호를 변화시키고 작동 여부 실험
* const 대신에 var 를 사용해서도 실험
* res.* 를 단순화 한 후에 실험
Module
- Node.js 에서 모듈(module)은 JavaScript 라이브러리와 동일하게 간주할 수 있으며, 응용 프로그램에 포함 할 함수 집합입니다.
- Node.js 에는 추가 설치없이 사용할 수 있는 내장 모듈 세트(builtin modules set) 가 있으며, 대표적인 모듈에는 http, fs(file system), URL 등이 있습니다.
- 모듈을 포함하려면 require () 함수를 모듈의 이름과 함께 사용하십시오.
var http = require(‘http’);
- 이제 애플리케이션은 HTTP 모듈에 액세스 할 수 있으며 서버를 만들 수 있습니다.
http.createServer(function (req, res) {
res.writeHead(200, {‘Content-Type’: ‘text/html’});
res.end(‘Hello World!’); // or test with ‘<h1>Hello World! </h1>”
}).listen(3000);* check http module at https://nodejs.org/dist/latest-v6.x/docs/api/http.html
- os module
var o = require(‘os’);
console.log(o.platform()); -
NPM (Node Package Manager) 이란?
- NPM은 Node.js 패키지 관리자로서, 패키지 설치 및 버전 / 호환성 관리를 할 수 있는 커맨드라인 유틸리티입니다.
- http://www.npmjs.com은 수천 개의 무료 패키지를 제공하여 다운로드하고 사용할 수 있습니다.
- Node.js를 설치할 때 NPM 프로그램이 컴퓨터에 설치됩니다.
- 예를 들어, uglifyjs 라는 module/package를 설치해 보자.
C:/Users/Your Name/www> npm install uglify-js -g
Then … create a file “pretty.js” as follows :
function hello(name) {
console.log(‘Hi ‘+name);
}
hello(‘Jun’)그리고, 다음을 실행하면
C:/Users/Your Name/www> uglifyjs pretty.js -o pretty.min.js -m
pretty.min.js 파일을 살펴보시오.
- 프로젝트에서 package 관리 : $ npm init 실행 후
name: (www)
version: (1.0.0)
description: nodejs practice site
entry point: (index.js) app.js
…..그리고, package.json 파일 내용 확인.
다음에는, 또 다른 유용한 모듈 underscore 를 설치하고 다시 package.json 파일 확인.C:/Users/Your Name/www> npm install underscore –save
C:/Users/Your Name/www> less package.json{
“name”: “www”,
“version”: “1.0.0”,
“description”: “nodejs practice site”,
“main”: “app.js”,
“scripts”: {
“test”: “echo \”Error: no test specified\” && exit 1″
},
“author”: “Jun Ji”,
“license”: “ISC”,
“dependencies”: {
“underscore”: “^1.8.3”
}
}var us = require(‘underscore’);
var arr = [3, 6, 9, 1, 12];console.log(arr[0]);
console.log(arr[arr.length-1]);
console.log(us.first(arr));
console.log(us.last(arr));
Callback
- 자바스크립트에서는, 함수(function)는 일급 객체입니다. 즉, 함수는 Object 타입이며 다른 일급객체와 똑같이 사용 될 수 있습니다. (String, Array, Number, 등등..) function 자체가 객체이므로 변수안에 담을 수 도 있고 인수로서 다른 함수에 전달 해 줄수도있고, 함수에서 만들어질수도있고 반환 될수도있습니다.
- Callback function은, 특정 함수에 매개변수로서 전달된 함수를 지칭합니다. 그리고 그 Callback function은 그 함수를 전달받은 함수 안에서 호출되게 됩니다.
C:/Users/Your Name/www> node
> console.log(1+1);
2
> a = [3,1,2]; console.log(a);
[3,1,2]
> a = [3,1,2]; a.sort(); console.log(a); // check with manual from w3schools
[1,2,3]
> a = [3,1,2]; function b(v1,v2){return v1-v2}; a.sort(b); console.log(a);
[1,2,3]
> a = [3,1,2]; function b(v1,v2){return v2-v1}; a.sort(b); console.log(a);
[3,2,1]
> a = [3,1,2]; function b(v1,v2){return 0}; a.sort(b); console.log(a);
[3,1,2]
> a = [3,1,2]; function b(v1,v2){console.log(‘c’+v1+v2); return 0}; a.sort(b); console.log(a);
c 3 1
c 1 2
[3,1,2]// 이 처럼 함수의 한 인자로 주어진 함수를 callback 함수라 한다
> a = [3,1,2]; a.sort(function(v1,v2){return v2-v1}); console.log(a);
[3,2,1]// generic example
> function sort(callback){callback();};
> sort(function(){console.log(‘Hello Callback’)});
Hello Callback
> .exit
Sync vs. Async (동기 vs 비동기)
- 실생활에서의 비유 : 상황- 세가지 일( 빨래, 설거지, 청소) 각각 한시간씩 걸린다고 가정.
- 동기적으로 일을 처리하기 – 빨래를 하고, 그 다음에 설거지를 하고, 그 다음에 청소를 한다. => 총 3시간이 소요된다.
- 비동기적으로 일을 처리하기 – 빨래와 설거지, 그리고 청소를 해주는 업체가 있다. 빨래업체에 전화를 걸어 빨래를 요청한다 (e.g. 전화하는데 1분 소요) , 설거지업체에 전화를 걸어설거지를 요청한다 (e.g. 전화하는데 1분 소요) , 그리고, 청소업체에 전화를 걸어 청소를 요청한다 (e.g. 전화하는데 1분 소요) . 따라서 전화를 하는데 총 3분이 걸렸다. 무엇이 먼저 될지는 모른다 (단점일 수 있다), 하지만 순서가 중요하지 않다면 이렿게 처리할 수 있다. 이렇게 하면 자원을 효율적으로 활용할 수 있다는 장점이 있다.
// fs.readFile() <== asynchronous
// fs.readFileSync() <== synchronous\
var fs = require(‘fs’);// Sync – check with nodejs namual for readFileSync
console.log(‘1’);
var data = fs.readFileSync(‘data.txt’,{encoding:’utf8′});
console.log(data);// Async check with nodejs manual for readFile
console.log(‘1’);
fs.readFile(‘data.txt’,{encoding:’utf8′}, function(err,data) {
console.log(2);
console.log(data);
});
console.log(3);
HTTP Module
- Node.js가 HTTP (Hyper Text Transfer Protocol)를 통해 데이터를 전송할 수 있습니다.
- HTTP 모듈은 서버 포트를 수신하고 클라이언트에 응답을 제공하는 HTTP 서버를 생성 할 수 있습니다.
- createServer () 메서드를 사용하여 HTTP 서버를 만듭니다.
var http = require(‘http’);
//create a server object:
http.createServer(function (req, res) {
res.write(‘Hello World!’); //write a response to the client
res.end(); //end the response
}).listen(3000); //the server object listens on port 3000 - HTTP 서버의 응답이 HTML로 표시되어야하는 경우 올바른 내용 유형의 HTTP 헤더를 포함해야합니다.
var http = require(‘http’);
http.createServer(function (req, res) {
res.writeHead(200, {‘Content-Type’: ‘text/html’});
res.write(‘Hello World!’);
res.end();
}).listen(3000); - res.writeHead () 메서드의 첫 번째 인수는 상태 코드이고, 200은 모두 정상이며, 두 번째 인수는 응답 헤더가 들어있는 객체입니다.
- http.createServer ()로 전달 된 함수는 클라이언트 로부터 요청을 나타내는 객체로 req 인수를 가집니다. 이 객체에는 “url”이라는 속성이 있습니다. 이 속성은 도메인 이름 뒤에 나오는 URL의 일부를 포함합니다.
var http = require(‘http’);
http.createServer(function (req, res) {
res.writeHead(200, {‘Content-Type’: ‘text/html’});
res.write(req.url);
res.end();
}).listen(3000); - 쿼리 문자열을 URL 모듈과 같이 읽을 수 있는 부분으로 쉽게 분리 할 수있는 모듈이 내장되어 있습니다.
var http = require(‘http’);
var url = require(‘url’);
http.createServer(function (req, res) {
res.writeHead(200, {‘Content-Type’: ‘text/html’});
var q = url.parse(req.url, true).query;
var txt = q.year + ” ” + q.month;
res.end(txt);
}).listen(3000); - http://localhost:3000/?year=2017&month=July 는 다음과 같은 결과를 준다.
2017 July - Need to include an explanation of how to include self-generate module into a js file
> in the module “myModule.js”
module. exports = myModule;
> in the file
var myModule = require(‘./myModule’);
Review the first example
- 또 다른 표현 방법
var server = http.createServer(function(req, res) {
res.statusCode = 200;
res.setHeader(‘Content-Type’,’text/plain’);
res.end(‘Hello World – 2’);
});server.listen(port,hostname, function() {
console.log(‘Server is running at http://’+ hostname + ‘:’+ port);
})또는…
function onRequest(req,res) {
// type 1-1
res.writeHead(200, {‘Content-Type’:’text/plain’});
res.end(‘Hello World -3’);
// type 1-2
//res.writeHead(200, {‘Content-Type’:’text/html’});
//res.end(‘<h1>Hello World -3<h1>’);
}function onResponse() {
console.log(‘Server is running at http://’+ hostname + ‘:’+ port);
}http.createServer(onRequest).listen(port, hostname, onResponse)
Introduction
MEAN Stack 이란?
MEAN Stack의 각 앞글자는 독립적인 기술 이름에서 철자를 따온 것이다.
M: MongoDB, E: Express JS, A: Angular JS, N: Node JS
각 기술들의 포지션(역할)을 알아볼 필요가 있다.
- MongoDB는 NoSQL 진영의 대표적인 데이터베이스 기술이다.
- Node JS는 서버를 구축하기 위해 사용되는 JavaScript 플랫폼(프로그램 실행 환경) 이다.
- Express는 Node JS로 웹 서버를 구성시, 필요한 환경 설정및 관리등을 담당하는 프레임워크(프로그램 기본 구조)이다.
- Angular JS는 프론트엔드 에서 (사용자에게 보여주기 위한) 동작하는 방법등을 정의하는 프론트엔드(front-end)-프레임워크이다.
한번 쯤 이름을 들어보신 분들은 알겠지만 4가지 기술 모두 Javascript 언어에 그 뿌리를 가진다. 각 기술들이 가지는 장점 (물론 단점도 있다) 들을 제외하더라도, 일단 동일한 Javascript 언어로 웹 어플리케이션을 제작하기 위한 모든 것을 작성 가능하다는 것은 큰 장점으로 다가올 수 있다. 과거에 서버는 JSP/PHP/ASP로 구성, 데이터베이스는 MySQL/MS-SQL/Oracle로 구성, 프론트엔드에는 javascript로 구성하는 방식들이 사용되었고, 현재에도 사용되고 있다. 모든 환경에 대한 언어에 정통한 것이 불가능은 아니지만, 상당한 골칫거리가 될 수 있으며 개발 후 유지/보수 차원에서 볼때, 단일 언어로 작성된 웹 어플리케이션은 큰 장점을 가진다.
* 출처: http://dog-paw.tistory.com/entry/MEAN-스택-구성-요소-MongoDB-Express-AngularJS-Nodejs [Dog발]
Useful resources on the Web
- 강의록 1 – https://velopert.com/node-js-tutorials
- 강의록 2 – http://pyrasis.com/nodejs/nodejs-HOWTO/#websocket
- 강의록 3 – https://www.tutorialspoint.com/nodejs/index.htm
- 강의록 4 – https://www.w3schools.com/nodejs/default.asp
- 강의록 5 – https://developer.mozilla.org/en-US/docs/Learn/Server-side/Express_Nodejs
- 강의 비디오 1 – Do it! Node.js by 정재곤
- 강의 비디오 2 – Server Side JavaScript (nodejs) by 생활코딩
